When leaving for the autocross two weeks ago, the drivers side window decided it wanted to permanently live in the door, and refused to come back up. For the autocross, this was fine, but not for the rain the following week.
Anyhow, after pulling the door apart, it was apparent that one of the cables had snapped. Getting the assembly out of the door was a bit of a pain without being able to raise the window, but eventually it came out.
Now, the 'vert assemblies are much different than the coupe ones. I don't know why, but basically there is an electric motor turning a spool, with cable un-winding from one side while it is winding on the other side to pull the window up or down. Even though only one cable broke, when the tension was released from that side & the motor was spinning, it really wrapped the other one up badly and deformed it, so I needed to cut the other one to be able to disassemble everything.
These pictures show the bottom cable already complete & assembled - I had gotten everything together & working but the top cable was about 3" too short, which didn't allow the window to roll all the way down. Measure Twice & Cut Once! Anyway, the bottom cable was the easy one to string, and fixing the ends was the same for the top & bottom. I'm working on the drivers side (US Market), the pass side is a mirror-image, so keep this in mind with things like tightening directions, etc.
Ok, you'll need:
42" of 1/16" dia braided steel cable for the top
62" of 1/16" braided steel cable for the bottom
2 cable anchors
Solder & a soldering iron
Flathead & philipshead screwdriver, needle-nosed pliers, vice-grips or similar & a hammer
White Lithium grease or similar, I've used silicone-based greases before too
Now, to be clear: The top cable is the one that runs from the end of the motor assembly to the top cable holder, and down to the window carrier. This cable is the one that pulls the window carrier & window up. The bottom cable comes out of the motor assembly in the middle, runs to the bottom cable holder (also on the top of the slide), then runs all the way down the slide, around the U-bend at the bottom, and up to the bottom of the window carrier. The bottom cable pulls the window carrier down.
To start, plug in the soldering iron so it warms up, remove the old cables from the assembly, and the 4 philipshead screws holding the motor cover on.

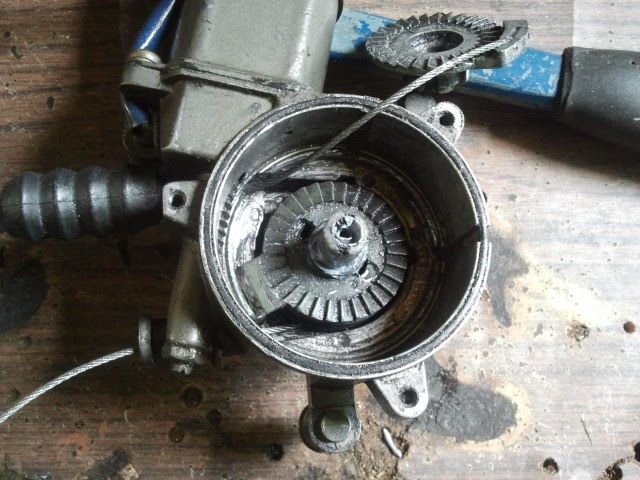
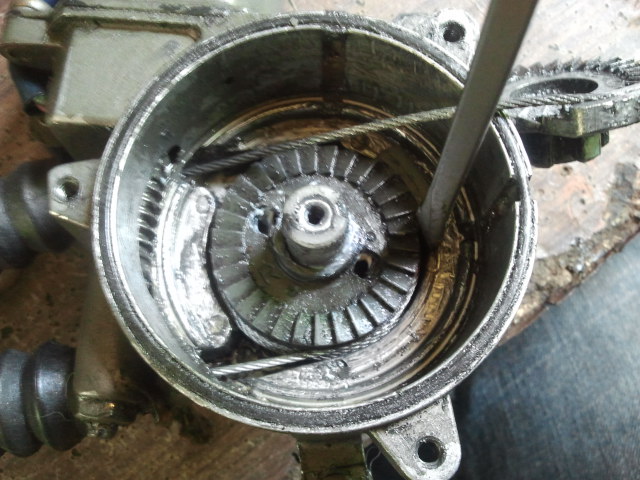
Now, pull out everything in there. It should all come out readily with the pliers. Here's the motor & housing with everything removed:

All the internals are stacked up with the spool on the right in the picture below on the bottom, then the metal disk with matching teeth on top of the spool (so that the teeth engage), then that disk-spring, then the gear wheel that engages the motor's worm gear (with the 4 large grooves facing up), and then the big rubber drive-dampener thing with the protrusions sitting in the gear wheel's grooves, and the splines engaging with the metal disk, and then the cover.

The spool actually comes apart a bit further - there is the outer spool, an inner plastic tube with a slit, a torsion spring that goes between the two, and a bottom plate that holds the top cable end. To start, make sure that the torsion spring isn't bent (mine was, so i had to cut it & re-bend the end that grabs the inner plastic tube) and that both ends are engaged so that if you twist the the outer spool while holding the inner plastic tube, it springs back.

This torsion spring is there to "wind up" as the window is lowered and unwind as its raised, helping the motor to raise the window while slowing the rate of descent down when you lower the window. Thus, it should be pretty-much un-tensioned when the window is at the top of its travel. We'll come back to this later on.
Assemble the outer spool, torsion spring, & inner tube as shown above, then grease liberally. Make sure you get some between the outer spool and inner tube at the top, and between most of the wrappings of torsion spring. Put the bottom plate back on so that you can see the cut-out for the cable end & cable.
Now, take one end of each of the replacement cables and the soldering iron, and solder a nice blob on one end. This will be the cable stop within the motor/spool assembly. Get the cable nice & hot and make sure that the solder wicks into it so that the blob can't come off!

You'll probably need to file down a little bit of the blob to fit into the spool. Give it a good tug to make sure the blob is big enough not to slip out, and is attached to the cable sufficiently well.
The top cable is shown in the bottom of the spool in the picture above - the bottom cable goes into the metal disk that sits on top of the spool in a similar manner.
Now, feed the un-finished end of the top cable through the hole at the end of the motor housing, and the un-finished end of the bottom cable through the hold in the middle of the motor housing. Grease up the cables about 2" from the end, and pass them through their respective cable sheaths and into the plastic guide at the top of the slide. Grease the plastic guide where the cables will be running. I have the plastic guide detached from the slide here to make it easier to get the carrier hooked up and back on the slide.

Now that the un-finished ends are through the plastic guide, its time to finish them! Make sure that the ends of the cable are clean & not greasy. Slide on the little rectangular washer that had been on the original cable (i had to re-make one from a bit of steel since I lost one... oh well), then slide on the aluminum cable anchor.
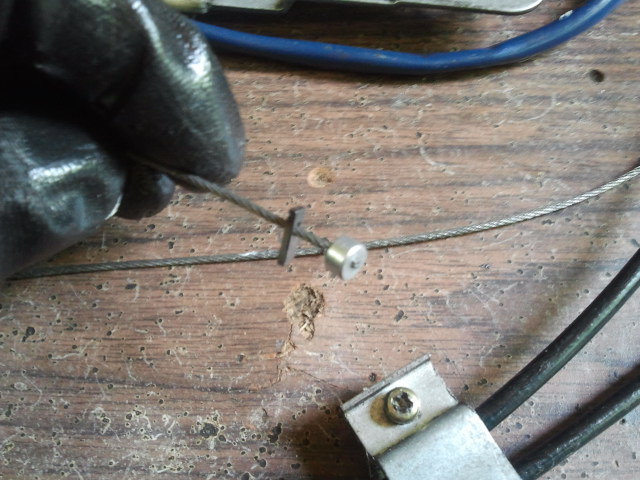
Now, I crushed the anchor in a set of vice grips first, to make sure I could keep the cable fully in it and positioned where I wanted it. Then, put it down on some hard surface & hammer it flat. It needs to be flat enough that it holds the cable well, slides into the window carrier, and can fit next to another flattened anchor in it's final position, but not so flat that the aluminum is starting to crack or stretch too far & lose its strength.

Now, slide the flattened cable anchor & rectangular washer on the cable through the slot on the window carrier. They should go in on the side of the carrier that faces the slide, and stick out of the side of the carrier that faces outwards. Now, press them both into the cavity that they're sticking out of, so that they're flush & held in place. MAKE SURE THAT THE TOP CABLE EXITS THE SIDE OF THE CARRIER THAT'S SUPPOSED TO POINT TOWARDS THE TOP OF THE SLIDE!!! THE BOTTOM CABLE SHOULD COME OUT THE SIDE WITH THE HOOKS MEANT TO HELP HOLD THE BOTTOM OF THE WINDOW GLASS!!! Here they are in their final position seen from the outward side of the carrier

And from the side of the carrier that faces the slide
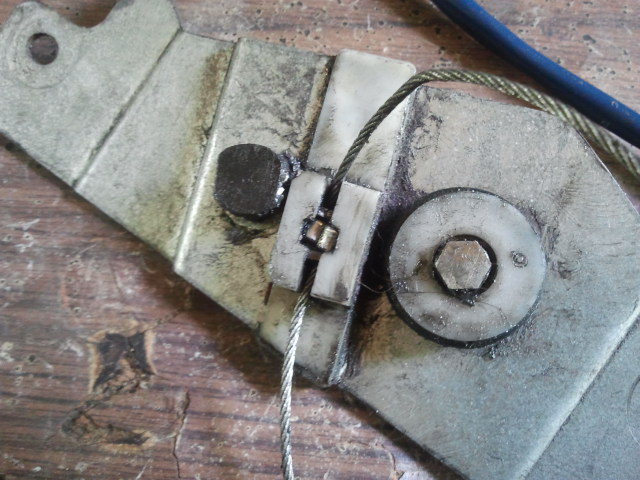
(I had to replace the brass-looking pressed in portion of the carrier, since the bushing that used to go around it had completely disintegrated, allowing the carrier to twist a lot on the slide. Now it's a sliding door pulley with a rubber o-ring in the "V" of the pulley)
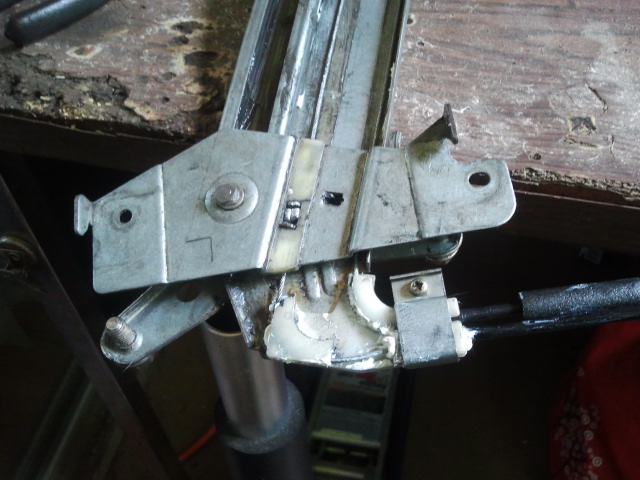
Now, put the window carrier into the slide from the top, with the plastic cable guide removed. Grease the inside of the channel of the slide, as well as the side of the channel that the window carrier runs against.


Grease the U-bend at the bottom of the slide, then run the bottom cable around the U-bend and slide the plastic cable guide onto the top of the window slide. Keep the window carrier at the top of the slide, and pull all the excess cable through the cable sheaths so its sticking out of the motor housing.

Detach the top cable sheath from the motor housing & pull the excess cable out of the housing. Drop the spool & it's inner plastic tube over the metal shaft in the center of the housing. Don't push the inner plastic tube all the way down, allow it to stick up off the metal shaft a little bit. It will only be able to be pushed all the way down when it is aligned properly with a feature on the bottom of the housing, which will happen later. Make sure that the torsion spring is still attached & "spring-y" - to avoid detaching it you should only rotate both the spool & the plastic tube together. Do NOT rotate just the plastic tube clockwise or just the spool counterclockwise, this will detach the spring.
Now, rotate both the spool & the tube counterclockwise to wind up the excess length of the top cable. Make sure to push the cable down into the bottom-most groove as you begin winding with a screwdriver or something - it will stay there once you've gotten about a half-turn wound. Once you're done winding up the slack and have re-attached the cable sheath to the motor housing, stick a screwdriver between the tab on the spool & the housing to keep it from unwinding.

Now, keeping that screwdriver there to hold the spool, grab the inner plastic tube with the pliers and rotate it counterclockwise-only while pushing downwards until you feel it slide down and engage in the feature in the motor housing. Depending on the position of everything, you may need to twist it almost a full rotation. You'll know you got it right if the top of the plastic tube is now flush with the threaded metal shaft in the middle of the housing, and that the tube can no longer rotate.

You've basically just set the torsion spring to 0 (or almost 0) tension with the window carrier at the top of its travel, so it will get tensioned as the window is lowered, and release tension as the window is raised to help the motor. See, the tube is now flush with the top of the metal shaft.
Now time for the metal disk that goes on top of the spool and holds the bottom cable end. Smear a dab of grease around the inner plastic tube where the metal disk will be touching it, and drop the disk over the tube. Route the bottom cable under the tab of the spool (so that the bottom cable will also wind - in the opposite direction - on the spool), and rotate the metal splined disk clockwise to tighten the bottom cable. Tighten it until you start to compress one of the springs between the end of the cable sheath and the motor housing, then push the metal disk downwards so that it engages with the teeth on the top of the spool to hold it in place.


This will only work properly if the tab on the spool & the piece of the metal disk that holds the bottom cable don't line up or hit. If they do, you may need to trim about half-a-turn's worth of cable off of one of the ends & re-solder a blob on the end. At this point, you should be able to turn the splines of the metal disk in either direction (while pushing down to keep it engaged with the spool), and raise or lower the window carrier without binding. I'd recommend doing this a couple times just to make sure the cables aren't going to tangle, that everything moves smoothly, and that you have enough tension in the cables. If the cables seem to go slack at any point (especially when reversing direction), twist the metal disk clockwise another tooth or two with respect to the spool. Pack a bunch of grease in between the cable around the spool & the housing once you're sure its working well, and run it through its travel again to make sure you can get the grease applied everywhere.
Now, reassemble. Put that circular spring down on top of the metal disk, then the plastic gear wheel so that one tooth of the spline is roughly aligned with the center of the large grooves in the gear (grooves up!). Make sure the gear engages with the worm gear of the motor. Drop the rubber drive damper on top of the gear so that it simultaneously engages with the spline and its protrusions go into the grooves in the gear. Put some of the grease on the top of the damper, then put the lid on it all & screw it down. Try it with a car battery or some other 12V source (at least 10-15 amps), and put it back in the door. Done!

